
How to Host Wordpress Website in AWS
Considering making the leap to install WordPress on AWS directly? Amazon Web Services (AWS) is the biggest provider for cloud hosting services, so it makes sense to consider trying it out.
Knowing how to install WordPress on AWS involves a bit more work than with other hosting providers. However, cloud hosting is quickly becoming standard for a lot of businesses. This means knowing how to navigate AWS can only benefit you and your website.
In this article, we’re going to teach you how to install WordPress on AWS in steps by steps . Let’s get to work!
Step 1: Create an Instance
What type of EC2 instance should you use? I started my experiments with a Micro instance because its price structure is very attractive. To create a new instance, access the AWS Management Console and click the EC2 tab:
- Choose an AMI in the classic instance wizard: I chose the Basic 32-bit Amazon Linux AMI.
- Instance details: Select the Instance Type you want to use. I chose Small (t2.micro). You can change the instance type later.
- Create a new key pair. Enter a name for your key pair (i.e. royex) and download your key pair (i.e. royex.pem).
- Select the quick start security group.
- Launch your instance.
Step 2: SSH into your Instance
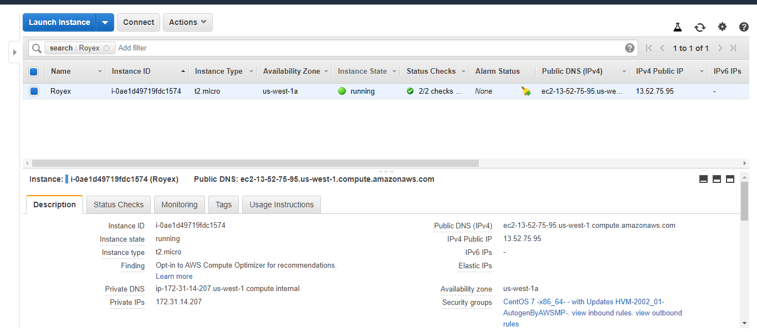
Once your instance is running, you can ssh into it. First, you need to identify the address of your instance: Select the instance in the AWS Management Console, and look for the Public DNS in the instance description.
Use that address (and a path to your .pem file) to ssh into your instance:
ssh ec2-user@ec2-13-52-75-95.us-west-1.compute.amazonaws.com -i ~/royex.pem
If you get a message about your .pem file permissions being too open, chmod your .pem file as follows:
chmod 600 ~/royex.pem
Many of the shell commands below require root access. To avoid having to prefix these commands with sudo, let’s just switch user once and for all:
sudo su
Step 3: Install the Apache Web Server
To install the Apache Web Server, type:
yum install httpd
Start the Apache Web Server:
service httpd start
To test your Web Server, open a browser and access your web site: http://ec2-13-52-75-95.us-west-1.compute.amazonaws.com (Use your actual public DNS name). You should see a standard Amazon placeholder page.
Step 4: Install PHP

To install PHP, type:
yum install php php-mysql
Restart the Apache Web Server:
service httpd restart
Create a page to test your PHP installation:
cd /var/www/html
vi test.php
-> Type i to start the insert mode
-> Type <?php phpinfo() ?>
-> Type :wq to write the file and quit vi
Open a browser and access test.php to test your PHP installation: http://ec2-13-52-75-95.us-west-1.compute.amazonaws.com/test.php (Use your actual public DNS name).
Step 5: Install MySQL
To install MySQL, type:
yum install mysql-server
Start MySQL:
service mysqld start
Create your “royex_db” database:
mysqladmin -uroot create royex_db
Secure your database:
mysql_secure_Installation
Answer the wizard questions as follows:
- Enter current password for root: Press return for none
- Change Root Password: Y
- New Password: Enter your new password
- Remove anonymous user: Y
- Disallow root login remotely: Y
- Remove test database and access to it: Y
- Reload privilege tables now: Y
Step 6: Install WordPress
 To install WordPress, type:
cd /var/www/html
wget http://wordpress.org/latest.tar.gz
tar -xzvf latest.tar.gzcd
This will uncompress WordPress in its own “wordpress” directory. I like having WordPress in a separate directory, but would rather rename it to “royex”:
mv wordpress royex
Create the WordPress wp-config.php file:
cd royex
mv wp-config-sample.php wp-config.php
vi wp-config.php
- Type i to start insert mode.
- Modify the database connection parameters as follows:
define(‘DB_NAME’, ‘royex_db’);
define(‘DB_USER’, ‘root’);
define(‘DB_PASSWORD’, ‘YOUR_PASSWORD’);
define(‘DB_HOST’, ‘localhost’);
- Type :wq to write the file and quit vi
Open a Browser and access your royex: http://ec2-50-17-14-16.compute-1.amazonaws.com/royex (Use your actual public DNS name). This should trigger the WordPress configuration process.
Step 7: Map IP Address and Creating Hosted zone at Route 53
To use your “royex” in production, you will have to:
- Associate an IP address to your instance
- Map your domain name to that IP address
To associate an IP address to your instance:
- In the AWS Management Console, click Elastic IPs (left navigation bar)
- Click Allocate New Address, and confirm by clicking the “Yes, Allocate” button
- Right-click the newly allocated IP address and select “Associate” in the popup menu. Select the instance you just created and click “Yes, Associate”
The following steps show how to create a hosted zone and record set for your server or root zone.
- Login or signup into Amazon AWS.
- Select My Account / Console → AWS Management Console → route 53. It leads you to a dashboard showing the available hosted zones.
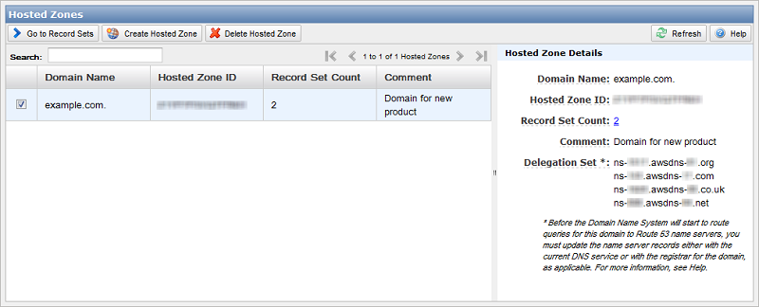
- Click on the Create Hosted Zones button to create a new hosted zone. Write the name of the domain in the Domain name field and add some comments in the comment field. Comment filed is an optional field. Before pressing the create button check the name of the domain. Finally press the create button.You can see that the dashboard shows a new item in the Hosted Zone. Select the particular domain and click on Go to record sets.
- You can see 2 record sets have been already created. One is NS type another is SOA type. From here you can create the hosts of your domain. To create a new Record Set click on Create Record Set.
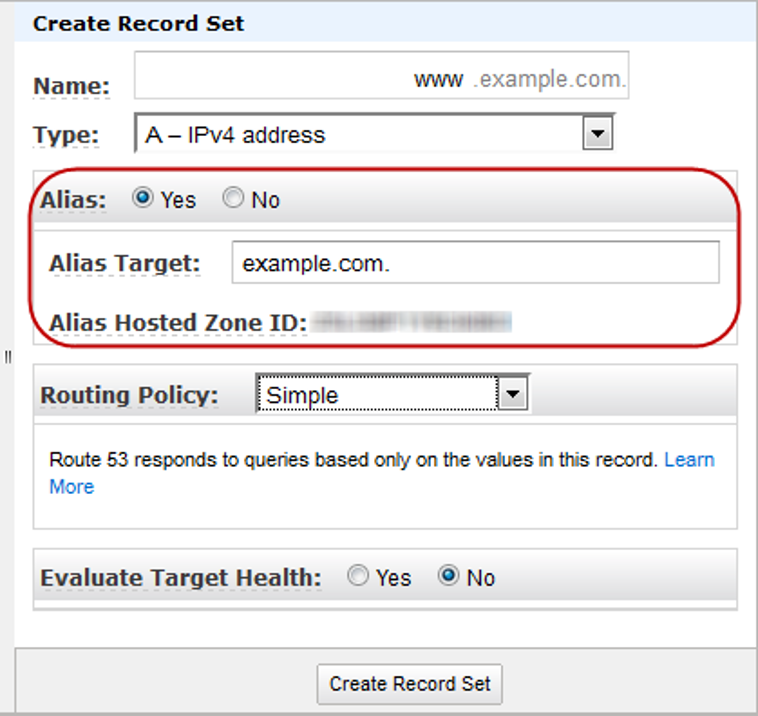
- Enter the hostname without protocol; such as docs, api, etc. You don’t have to mention the http or https protocol.
- Then you have to mention the type of record set.
- Then press the Create button to create the record set.
Hope this gives an idea on how to create your own hosted zone and record set in Amazon route 53.
Royex Technologies is one of the leading companies in Dubai for designing cloud servers and maintenance. For all AWS consulting and services, choose Royex. To get started, call for any inquiries at +971566027916 or mail at info@royex.net